Sunday, January 22, 2012

Paper Roll Cross (two actually) on my $0 budget

I realize this idea is somewhat of a repeat of a $0 budget project from last, but I thought it was worth the post since it really is different and I absolutely love how they turned out.

So here they are, paper roll (aka paper towel/toilet paper roll) crosses.


If you did not see the toilet paper 'art' I created (below) last year on my $0 budget, you can see it here.

So I used the same technique as my previous project. I flattened the paper roll (I used mostly paper towel rolls this time) and cut the two ends off each of the rolls. I then cut (with a rotary cutter) the flattened rolls into a approximately 1 inch pieces.
 If the seam starts to come undone on the inside, just hot glue it as you go.

I start by making little flowers making sure to get the 4 corner points together nicely.

Once you make a few of these, lay them out and figure out the design you like. Then glue together the flowers and add any additional pieces to make your shape.

After you have glued all the pieces together, prime the entire piece with spray paint primer. This cannot be skipped, otherwise your paint will look blotchy.  Wait the recommended time and then spray paint to your desired color.
I did two coats of spray primer and then a few coats of oil rubbed bronze for my cross. It really does look like it is metal! There is a slight shine of gold when the light hits it.
  I love how it looks with the iron wall piece I have in my dining room.
 

Cross #2
My daughter designed this one all by herself. She wanted it to look like a cross of flowers and then leaves coming out of the ends. She asked me to spay paint the pieces different colors and at first I thought it wouldn't look nice, but thought it doesn't cost anything if we need to make it again. But I love how it looks.
Isn't it adorable? Perfect for her room!
What do you think?

How has your month been? I have been so busy working out this month, I don't miss shopping. I long for sleep more than anything else :)

There are some amazing guest posts this week so be sure to stop by.

Have a great week,
Stephanie

Thursday, January 19, 2012

Piercing American Girl Doll's ears on my $0 Budget

I am sorry I have been absent for over a week. I started a new fitness session and it is kicking my butt; I have no energy to do anything. Actually, it hurts right now to lift my arms up to type :) Next time when your loving sister-in-law asks you to join bootcamp with her, just know you will be tired, grumpy and sore for the full 8 weeks :) But I do love, so I am thankful for the invite.

Over a year ago we packed up our car and drove to New York City with the kids for a family holiday. Three of us had never been to New York before (my husband had been) and we were very excited. It was a month or so before my daughter's birthday so my husband and I decided to surprise her with a trip to American Girl; we made reservations at the Cafe for dinner and then while we were their bought her her first American Girl doll. She carried that doll around New York for 4 days with pride and excitement.

Well after we returned home from our holidays, she asked if she could get her own ears pierced. This was something we had held off doing until she could make the decision on her own and was mature enough to care for it. After much discussion and 30 minutes of crying/screaming at the salon, she got it done. I will add, after the women did both ears at the same time she said "That didn't hurt at all." I am glad my husband video taped some of her pre-ear piercing fun. Now this meant her American Girl no longer looked exactly like her.

Ever since she has been hoping we could go to an American Girl store to have Emily's ear's pierced. We have not made it to one and I refuse to mail the doll away. So, we decided to try to do it ourselves. I thought "Come on, how hard could it be?" Boy does my husband hate when I say those words. But this time it wasn't difficult.

We pulled together the tools we thought would be necessary.
  • Hammer
  • Pliers 
  • Thick sewing needle
  • Old pair of earrings
Method

Identify where you want the earrings to be situated on the dolls ears. You will just be putting the earring into the ear and no back will be used. The earring post just goes into the dolls head.


Place the doll on a hard flat surface and using a hammer, gently tap the thick sewing needle to make the hole.
I do not recommend using a tack because it will make the hole too large and the earrings will just fall out.
What a horrible shot :)  It really reminded me of when I was younger and kids would try to pierce their own ears.

If necessary, use pliers to pull the needle out of the ear.

Insert earrings and you are done!
Here is Catrina with Emily (American Girl #1).

Well, after her first doll was done, she was determined for dad to pierce her other American Girls ears too.

If you were to get their ear's pierced at the store, they would charge us $14 per doll. So we saved $28 and now we don't have to carry the dolls with us on our next vacation. A Win win in my books.

What have you been up to on your spend free months?  Anyone else feel like they are not able to move as a result of their dumb New Year's resolution to get back in shape?

I hope to have more $0 ideas soon.
Stephanie

Tuesday, January 17, 2012

$0 Budget Month Guest Post: Mother Hen Strikes Again


Hi There, Mother Hen here, my blog is Mother Hen Strikes Again. I'm a crafter, cook, mother and love making and baking!


I first came across Stephanie's blog in November 2011 on Pinterest. Someone had pinned her blog post about $0 for the month of March 2011. I am fairly new to the blogging scene and thought this was a brilliant idea, I thought what a fabulous idea! I left a comment for Stephanie saying she had inspired me to do this in January when things are naturally tight after over spending at Christmas. I also have a ton of unfinished projects and craft items around the house, surely I could get on and use some of these things up! This was just the inspiration I needed to rise to the challenge! Stephanie kindly emailed me and asked if I would like to join her through this journey in January and I replied that I would love to! And so the journey began....


I came up with 7 Golden Rules to live by for the month, see my original post for those. I have then set to coming up with some ideas to use up these craft supplies I have!


So far I have made quite a few things I'm very pleased with. I will give you a peak at just a few, but please feel free to visit my blog.

Golden Rule 3 states, not buying any sweets or treats! So having to curb that sweet tooth, means I've been using up the baking ingredients in my cupboards to make some yummy goodies...


Blueberry and White Chocolate Muffins


I have also made a couple of nice things with some crafty leftovers or up cycling!

Shabby Chic Necklace, Old Jewellery and T-shirt
Felt Egg Cozies
And saving a few pennies with home made toiletries/cosmetics....
Body Scrub, Facial Scrub and Moisturiser
Please feel free to join us for the rest of the January $0.00 Spend Challenge, it's not to late to join in the fun! Yes being Thrify can be Fun!

Mother Hen

Monday, January 16, 2012

$0 Budget Month Guest Post: Tutus & Tea Parties

Hi, I'm Lauren. I am super happy to be sharing some ideas with you here on 
Full of Great Ideas!

I post over at Tutus & Tea Parties about art & activities for the kiddos, tutorials for the parents and some great info I come across for parents. I am a wife to a very understanding hubby who deals with crafting supplies taking over our small apartment and a moma to a 2 1/2 year old toddler {known as Bug} who loves to play, craft and cook with me. We live on a pretty tight budget so crafting isn't always something I can spend a lot on. If you ask Bug where she likes to shop she will tell you Walmart & Michaels. We love using our 40% off coupon at Michaels and will go once a day if we have to get multiple things {or we will drag along some friends or family to make a purchase for us}.

Here are a couple $0 budget projects we have done:


We used two toilet paper rolls, a scrap piece of yarn and glue. Easy peasy!


We used a paint strip {free at home stores & Walmart has them too}, glue, business magnets {like you get from the pizza place and what not}, and I used a brad...but that is optional.

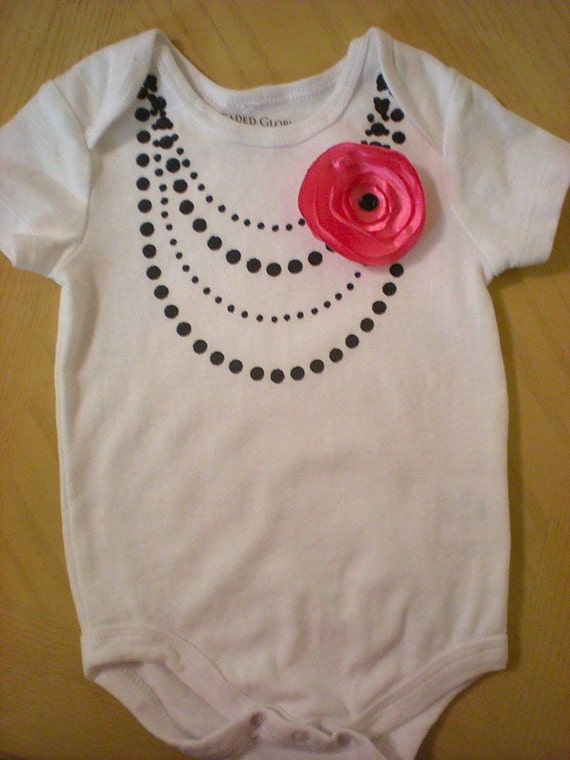
Necklace Onesie {flower optional}: Don't you just love baby bling?!


We used a white onesie we already had, acrylic paint or fabric paint {I have about 20 bottles of acrylic & fabric paint on hand...is that normal?}, a pencil and a small paint brush.


I'd love to know if you make any of these! Just post a pic on my Facebook page to show me.

Thank you,
Lauren


http://www.etsy.com/shop/crocheting4baby
http://tutusandteaparties.blogspot.com
http://www.facebook.com/pages/Tutus-Tea-Parties/142834599102143

Saturday, January 14, 2012

$0 Budget Month Guest Post: Organizing Made Fun

My name is Becky and I blog at Organizing Made Fun.


Stephanie asked me to help out with her month long challenge of $0 spending. I did an entire month or organizing on a very similar subject: 31 Days to cheaply organize your home!


Let me tell you that if you think organizing has to be expensive, it doesn't. I'm going to give you three examples of how to organize without having to break the bank! First is oatmeal containers!
This oatmeal container was turned into a ribbon organizer.

I have made one into a headband/hair things organizer for my daughter's hair things, too.
Source


How about a yarn organizer/holder? 

My next idea is hangers!  What about those dry cleaner hangers that come with your dry cleaning? If you were going to send them back or throw them away...consider this instead:
I found this cute way to organize flip flops - quite creative for someone with a large collection of flip flops. 


How about hanging scarves or tights? This is such a simple and easy idea!

Maybe you have a pants hanger that you no longer need?  Organize your ribbon! 

Last hanger idea...my friend, Julie, came up with this clever way to organize her boots! She took a skirt hanger with clips and clipped her boots!

OK, last idea is left-over containers.

Source
I used left-over containers to organize my whole stash of paint supplies.

You can use scrapbook paper to make ugly containers into something pretty and use somewhere in your home for organizing.


Or even use it to help organize things in your fridge - like snacks for your kiddos!


Well, I hope this gets your imagination going. I would love for you to stop by Organizing Made Fun and get more inspired by all kinds of organizing ideas.


I'm currently doing a series every Monday this month called "Organized Resolutions" and I'd love for you to check it out.


Photobucket

Tuesday, January 10, 2012

$0 Budget Month Guest Post: Busy Kids=Happy Mom!

Hi Everyone. I want to share with you the guest post sent to me by Kristen at Busy Kids = Happy Mom!  Kristen didn't have a lot to say in her post, so I thought I would share with you how cute her blog is. If you have kids (like I do), Kristen has some adorable ideas that your kids will absolutely love to make! Here are a few ideas that I found on her blog that I will be making with my guys. These may have not been $0 crafts for Kristen to make...but I can make them this month with stuff I have laying around my house :)
Coffee Filter Turkey
 Clay Mickey Mouse Snowman Ornament
 Glow Stick Lanterns (what child would not love this!)
Now here are the adorable posts that Kristen sent me for her $0 budget crafts.


Here are 2 popular posts for a $0 budget:
Spend, Save, Give Banks for Kids


Out of Pringles Cans!  Go here to see more!
Upcycled Craft for Kids
Out of things in your house!
Go here for our secret ingredient.

Be sure to stop by and meet Kristen, a part-time as a reading specialist.  She blogs about ideas for keeping her kids engaged, unplugged, and life skills training.  She also has a popular Mom Spotlight Series.  Visit her here at Busy Kids = Happy Mom. 

Monday, January 9, 2012

$0 Budget Month Guest Post: I'm Not a Trophy Wife


Hi Everyone


Happy New Year!   Stephanie over at  Full of Great Ideas  asked for Guest Posts on Full of Great Ideas during the $0 Budget Month.  I knew this was a post I could contribute to.. if I got my post submitted early!   

My name is Laura and I'm Not a Trophy Wife.  It's a description of myself and a blog title all rolled up into one!   I think the title says it all!  I always say I am many things, but I'm Not a Trophy Wife. I describe my decorating style as Pottery Barn inspiration meets  TJ Maxx, Target meets garage sale (heavy on the last two)!

So here are a few of my favorite $0.00 budget ideas.  These ideas came from items  I already had on hand.  I didn't have to leave my home or spend money to create these project!

My first project is an up cycling idea from large green bean cans.  I have changed these up several times during the year. The first project was for organizing my son's "treasures."


This project was created with burlap, ribbon and greenery in my craft room unfinished basement.


My next project is one of my most popular posts.  Here is the original post.


I repeated the theme for Christmas by adding branches from our Christmas tree and Cuties oranges.  Here is the original post.  So easy, zero dollars and they both have an organic look.


Here's a final project that was zero dollars (sorta)! I already had the super discounted dinged frames from Michael's and I had the scrapbook paper in stock.  I made it for Valentines Day, but it has a permanent spot in our bedroom.  Here's the final framed piece of artwork. It's leaning against 2 shoe boxes wrapped in a roll of brown paper from Home Depot I bought during the summer as a boredom buster for summer.

Thanks Stephanie for the opportunity to show simple ideas for $0.00 Budget Month.